Products and configurations to compare
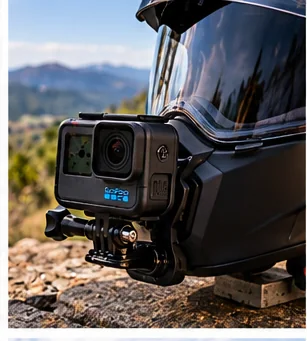
Helmet-specific chin mount
Usually the most natural riding POV.
Best when: your helmet has a compatible chin-mount solution
Watch for: must not block vents or chin-bar movement
GoPro curved adhesive mount
OEM-style adhesive mounting without drilling.
Best when: helmet surface has a safe compatible mounting area
Watch for: camera sits higher and can increase drag
Safety tether
Cheap loss prevention.
Best when: you ride with an expensive camera
Watch for: route so it cannot snag
Centerline reduces asymmetrical pull
That is why chin mounts are popular.
Visor and modular movement must remain free
Dry-fit every moving part before riding.
Adhesive needs cure time
Follow mount-maker cleaning and cure instructions.
Camera angle should include horizon
Too much dashboard or sky reduces useful footage.
Keep emergency features accessible
Do not cover cheek-pad pulls, vents or release mechanisms.
Helmet cameras add weight and aerodynamic load
A modern action camera is light in the hand but noticeable when mounted far from the helmet's centerline. Chin mounts usually feel more balanced than high top mounts and produce a natural riding perspective. Side mounts create more asymmetrical drag. Any mount should avoid compromising the shell, visor mechanism, vents or emergency-release features.
Use adhesive or manufacturer-supported mounts rather than drilling a certified helmet shell. A tether can prevent losing an expensive camera, but route it so it cannot snag controls, the motorcycle or roadside objects.
Battery and storage matter more than headline resolution
Long rides consume batteries and memory cards quickly. 4K or higher settings create large files and heat. For commuting or evidence-style recording, long runtime, loop workflow and easy charging can be more valuable than maximum cinematic resolution.
Before checkout
- Accessory is explicitly compatible with the exact helmet model
- Nothing compromises shell, EPS, retention strap or emergency-release hardware
- Visor or Pinlock part number matches the exact shield
- Speaker/mic placement creates no pressure points
- Camera mount does not block vents or visor travel
- Tint remains legal and usable for expected light conditions
- Cleaning product is safe for visor coatings and shell material
- Storage allows helmet to dry before sealing it in a bag
- Replacement pads/liners are OEM or verified compatible
- Accessory improves a repeated riding problem rather than adding clutter
The accessory must not weaken the helmet
A motorcycle helmet is protective equipment first. Every speaker, mount, adhesive, camera, replacement pad and visor should work around the certified structure rather than forcing the structure to adapt to the accessory. Avoid drilling the shell, cutting EPS, blocking emergency tabs or routing hard objects where they can create pressure points against the head.
Compatibility names can also be misleading. “58 mm” style near-standards from other industries do not really exist here: visor geometry, cheek-pad snaps, speaker pockets and shell generations are usually model-specific. Exact part number beats visual similarity.
First-ride test
Test new helmet gear on a short familiar ride. Confirm the visor seals and locks, speakers do not press the ears, the communicator can be operated without looking down, the camera creates no distracting drag, and earplugs remain comfortable after thirty minutes. Stop and fix pressure or visibility issues rather than assuming you will “get used to it.”
After the ride, inspect mounts and cables, dry anything damp, and check that nothing shifted inside the liner. Good helmet accessories should become almost invisible once the ride starts.
Frequently asked questions
Is a chin mount safest?
It often minimizes asymmetrical drag, but safety depends on helmet/mount compatibility.
Can I drill the shell?
No, not unless the helmet manufacturer explicitly provides for it.
Should I tether the camera?
A short routed tether can reduce loss risk.
Can I mount on a modular chin bar?
Only if the mount does not interfere with opening/locking and the helmet maker permits it.
Current product/source checks
Affiliate disclosure: MotorcycleHelmets.co may earn from qualifying purchases through Amazon Associates and eBay Partner Network at no extra cost to you. Amazon links use scouttheory-20; eBay links use campaign 5339137014.